University Computing Solutions
Home » Solutions » FAQ » Instructions for File Transfer Protocol (FTP)
MenuInstructions for File Transfer Protocol (FTP)
These instructions are provided for those who cannot use Remote Desktop, which offers many more features than FTP.
Access to network files from on campus can be done easily through the drive instead of FTP. However, FTP or Remote Desktop are needed if you wish to edit files from off-campus. Since conventional FTP clients are not very secure, we require the use of a secure FTP client such as this one.
To set up the SSH secure FTP Client, right-click on this link and choose “save this link as…” or “save target as…”. It will give you a choice of where to save the installer file. If you aren’t sure where to put it, your computer’s desktop is a good place. Once the download finishes, go to the place where you saved the file and delete the number 1 from the end of the file name. (This is necessary because our server doesn’t allow direct downloading of executable files.) We also have a newer version available; download it in the same way, but be careful when following the instructions below, because the new version looks significantly different.
After renaming the file, double-click it to start the installation. It is OK if you see a security warning stating that the file’s publisher could not be verified; just click the Run button on the warning if it appears. Go through the install process; there will be a few questions, but it is OK to accept the default choices if you aren’t sure what something means.
Note that if you have a CD burner, USB drive, or some other method of carrying the file from campus to home, you may wish to download it on campus and then carry it home, as it is several megabytes in size and may take a while to download, especially with a modem!
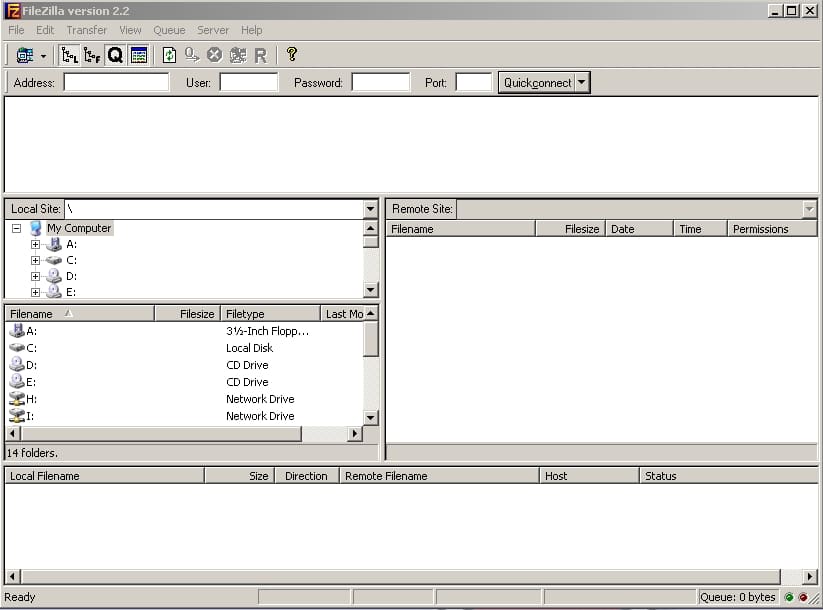
When the install is finished, there will be a FileZilla icon on your desktop. After double-clicking on it, this is what you should see:

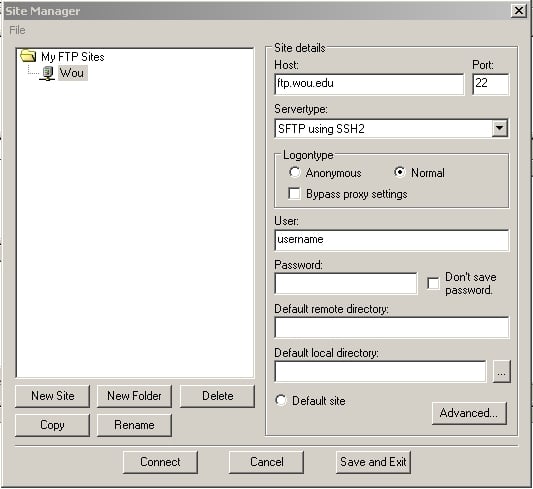
Once the program opens, go to the File menu and select Site Manager. Click on the New Site button. Type “Wou” for the site name.
Host: ftp.wou.edu
Port: 22
Servertype: SFTP using SSH2
Logontype: Normal
Bypass proxy settings: unchecked
User: Your on-campus (MASH domain) login name
Password: Your on-campus (MASH domain) password
- If you aren’t sure of your MASH domain password please go to https://dev.wou.edu/accountlookup and change your password. Email, network, and FTP passwords are all synchronized now, so this will change all of them.
Default Remote Directory: home:
You can enter any other FTP code here; see the list at the bottom. You will automatically be connected to whichever one you enter here.

The first time you click connect, FileZilla will say that the server’s host key is not cached in the registry. Choose “Yes” to store the key. Once you’re connected, you’ll see your personal folder listed in the Remote Site window (unless you chose a different default remote directory). Open your username folder by double-clicking. To copy a file, drag and drop your file into the local site window. To upload a file, drag and drop the file into the remote site window.
To access other volumes on the server, you will need to type in the correct FTP code in the “Remote Site” field.
To access your I: drive (staff group files) enter your group share code with a colon on the end.
To access the J: drive(shared folders) type share1: (that’s a number one at the end, not a lowercase L)
To access the K: drive (class folders) type class:
To access your P: drive (public_html files) type public_html:
(You must use this access point for personal web files; uploading them through the public_html folder in home: will not work!)
To access the X: drive (WOU website files) type web:
Don’t forget the colon at the end of each of these!
If you have difficulty with these instructions, please contact me at webmaster@wou.edu.

